Wednesday, September 19, 2018

Mastering IoT Development


Hi,

Before reading this post, I would recommend to read the post :

https://johnsylvester-johnsylvester.blogspot.com/2018/09/iot-key-concepts-skills-required.html

To understand  IoT development in depth , it is necessary to have overview of the following concepts:

1. IoT architectures

When building IoT solutions, challenges arise while :
  a) When connecting many heterogeneous devices,
b) Communicating using different networking protocols, and
c) Producing data in a range of formats.

An architecture ( for IoT solution) describes the organization of  :
  a) physical aspects (that is, the things) and
b) Virtual aspects (like services and communication protocols).

Layered architecture  approach helps to manage the complexity of IoT solutions


  1) Devices layer - Sensors come in this layer.
  2) Edge layer    -  Part of pre-processing is done by Sensor circuit or it is done by Gateway / Router
  3) Cloud layer   - Does data processing , often complemented by mobile apps ,web-based
                              client,dashboards and visualizations.
 

IoT reference architectures are readily available and it helps to manage complexity and facilitate better interoperability.

IoT reference architecture generally take care of following challenges faced :

a) Managing devices ,data and its challenges :
              1) security,
2) interoperability,
3) constrained devices,
4) scalability, and
5) availability.

         Standardized device management protocols for IoT devices in broadband and mobile industries include:

     1)TR-069 Customer Premises Equipment (CPE) WAN Management Protocol (CWMP)
    2)OMA DM - Open Mobile Alliance Device Management (OMA DM)
    3)LWM2M - OMA's Lightweight Machine to Machine (LWM2M)

b) Connectivity and communication using protocols


c) Analytics and applications. Analytics approaches include

  1) distributed analytics,
2) real-time analytics,
3) edge analytics, and
4) machine learning.
   
      Few Analytics solutions available in the market :

                  1) Oracle Edge Analytics and Stream Analytics
                  2) Azure Stream Analytics
                  3) AWS IoT
                  4) Google Cloud Dataflow
                  5) IBM Watson IoT Platform Analytics
     
d) Security challenges :
1) Secure constrained devices
2) Authorize and authenticate devices
3) Manage device updates
4) Secure communication
5) Ensure data privacy and integrity
6) Secure web, mobile, and cloud applications
7) Ensure high availability
8) Detect vulnerabilities and incidents
9) Manage vulnerabilities
10) Predict and preempt security issues


Some widely referenced IoT reference architectures include:

   1) Internet of Things – Architecture (IoT-A)
   2) IEEE P2413 - Standard for an Architectural Framework for the Internet of Things (IoT)
   3) Industrial Internet Reference Architecture (IIRA) 

Example : Industrial Internet Reference Architecture (IIRA)'s constructs and application:


Reference architectures serve as a template to apply to domains or specific platforms. Each vendor come up with their own way of implementing the IoT architecture, few reference architectures in market :

1) IBM IoT reference architecture
2) Intel IoT platform Reference Architecture
3) Microsoft Azure IoT Architecture
4) Amazon Web Services Pragma Architecture

Example : IBM IoT reference Architecture :


2. IoT developer kits

      Developer kits are physical hardware kits that you can use to fast-track development of your IoT solutions.

  Some popular IoT developer kits :

  a) Texas Instruments SimpleLink SensorTag Kit
          b) Adafruit Feather HUZZAH ESP8266 IoT Starter Kit
          c) Seeed Studio BeagleBone Green Wireless IOT Developer Prototyping Kit
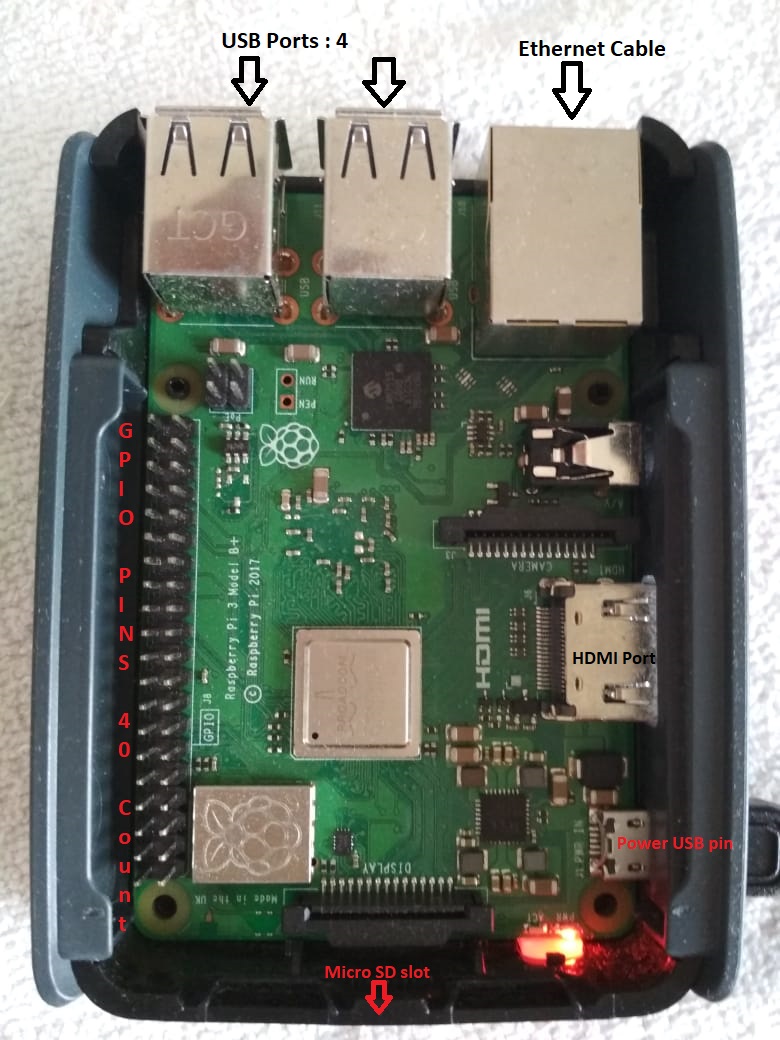
          d) Raspberry Pi 3 IoT Learner Kit
          e) Avnet AT&T Cellular IoT Starter Kit

3. Understand Large-scale IoT projects
 
Few examples of large-scale IoT scenarios are :

1) Connected cars
2) Connected cities
3) Smart Buildings
4) Manfacturing
  5) Supply Chain Management
6) Energy management
         7) Environmental safety
         8) Waste management
         9) Transportation: Parking, Traffic, and Public Transportation
       10) Emergency management and law enforcement
       11) Citizen engagement


This post contains the topics to master IoT in a nutshell. For further readings , refer to the references.

If you have any comments, feel free to drop a note. Have a nice day.... :)

References :

1) https://www.ibm.com/developerworks/library/iot-lp201-next-steps-guide-iot-developers/index.html

2) https://www.ibm.com/developerworks/library/iot-lp301-mastery-guide-iot-developers/index.html

IBM IoT Reference Architecture :
3)  https://www.ibm.com/cloud/garage/architectures/iotArchitecture

Industrial Internet Reference Architecture (IIRA) 
4) https://www.iiconsortium.org/IIC_PUB_G1_V1.80_2017-01-31.pdf?cm_mc_uid=42240287207114889661528&cm_mc_sid_50200000=1498959849


Monday, September 17, 2018

IoT Key concepts , Skills required & Choosing of IoT hardware


Hi,

 After couple of posts related to  Raspberry Pi & sensors, I felt it is necessary to understand the key concepts of IoT ( Internet of Things ) before proceeding further with handson :

What is Internet of Things ?

Every one would have heard about Internet of Things ( IoT in short ), it refers to physical  devices  which collect data from real world and shares these data over internet.

The collected data from physical devices are used by various industry domains to :

1. Increase Operational efficiency for business.
2. Provide improved value & experiences to  clients.

I would recommend to watch the video from IBM about IoT to understand it better :

https://www.youtube.com/watch?v=QSIPNhOiMoE


A. Skills needed for becoming a IoT Developer 

Since IoT is rapidly adopted across industry domains, the demand for skilled IoT developers who are able to deliver IoT solutions continues to rise.

IoT developer should develop skills across a range of key topic areas :

1. Hardware
               - Knowledge of circuit design
               - micro-controller programming
               - understanding of hardware communication protocols like serial, I2C, or SPI
               - programming languages like C, C++, Python , Nodejs 

2. Networking
         - Network design and management ( Knowledge of mesh networks which is widely used).
        - Knowledge of network standards, protocols, and technologies :
                              a)  Wifi,
                              b) Low Energy Bluetooth,
                              c) Zigbee
                              d) cellular and
                              e) RFID technologies

        - Knowledge of  Low Power Wide-Area Network (LPWAN) technologies like LoRa.
          LPWAN  includes SigFox and NB-IoT (narrow band IoT) which offer lower cost low-power long-range wireless connectivity.


3. Application design and development

              - Web and mobile app development (Java, Swift, Node.js.. ) for visualizing interaction.
              -   GPS programming skills which is widely used in mobiles.

4. Security
               - threat assessment
               - ethical hacking
               - encryption to ensure data integrity
               - securing network architectures and applications,
               - event monitoring,
               - activity logging
               - threat intelligence

5. Business intelligence and data analytics
              - Data analytics skills using Hadoop, Spark, and NoSQL databases like MongoDB.

6. Machine learning and artificial intelligence (AI)
               - Cognitive computing techniques drawn from data mining, modeling, statistics,
                  machine learning, and AI


B. Choosing the right IoT hardware 

IoT devices can be categorized  in terms of these high-level capabilities:

1. Data acquisition and control

         - Capturing data at regular intervals and convert into digital format. Sensors help to do the task.

2. Data processing and storage

           Data from the sensors can be either stored and processed or it can be

          1. data directly
          2. transmit the data to other devices like gateway devices
          3. To cloud services or apps for aggregation and analysis. 

3. Connectivity:

        Few popular connectivity technologies are

         1. 802.11 (wifi)
         2. Bluetooth
         3. RFID
         4. Cellular networks
         5. Low Power wide area network (LPWAN) technologies like LoRa, SigFox or NB-IoT.
   
4. Power management
       
       Power is essential for capturing real time data for sensors. It differs based on the data it captures.
     
       Sensors power sources differ in various ways

               1. Solar powered
               2. Continuously connected to power ( 3V or 5V)
               3. Some go to sleep mode to save power when not in use. 


IoT Hardware are of two categories :

     1. Microcontrollers
            It contains :
                 - Processor core (or cores)
                 - Memory (RAM), and
                 - Erasable programmable read-only memory (EPROM) for storing the programs
     
        Eg : a) Arduino Uno
                b) Particle Electron
                c) Espressif Systems ESP8266-01


     2. Single board  computers
         
     As the name says , single board computer, it contains all the features of a regular computer.

    Please note these single board computers don't come with monitor, keyboard and mouse.
        It has to be bought separately.
             
         Eg:
             a) Raspberry Pi 3 Model B
             b) BeagleBone Black
             c) Qualcomm DragonBoard 410c                 


I have chosen Raspberry Pi 3 Model B and Arduino Uno due to its popularity.

C. Understand Networking Protocols  

It is necessary to understand what networking protocols are required to have a strong foundation in IoT. Refer to the figure to know  what protocols are used compared to OSI & TCP / IP model.


D. Choosing IoT platform  

IoT platforms provide middleware :

   1) To connect and manage hardware devices
   2) Store and handle data
   3) Provide interface with mobile and web applications.
   4) Establish  secure communication between devices, apps, and services.

Few IoT platforms are :

1) IBM Watson IoT
2) Amazon Web Services IoT
3) Microsoft Azure IoT Suite
4) ThingWorx
5) Kaa

Since I work in IBM technologies, I prefer IBM Watson IoT platform because it provides a "Lite account" which you can try it out ( its totally free with limited capabilities ) :

https://www.ibm.com/cloud/


References :

What is IoT ?
1.https://www.youtube.com/watch?v=QSIPNhOiMoE

IoT 101 
2. https://www.ibm.com/developerworks/library/iot-lp101-quick-start-guide-iot-developers/index.html

Essential Skills 
3. https://developer.ibm.com/dwblog/2017/just-getting-started-iot-consider-7-key-iot-concepts-skills/

Hardware Selection :

4. https://www.ibm.com/developerworks/library/iot-lp101-best-hardware-devices-iot-project/index.html

Protocols for IoT
5. https://www.ibm.com/developerworks/library/iot-lp101-connectivity-network-protocols/index.html

IoT Platforms 
6. https://www.ibm.com/developerworks/library/iot-lp101-why-use-iot-platform/index.html

Wednesday, August 15, 2018

Getting started with Raspberry Pi 3B+, Arduino, IR Receiver( KY022) , RGB Full Color LED ( KY009)


Hi,

Everyone knows what Infrared Rays ( IR ) are. They are not visible to our eyes but it is used in day to day life in remote control for controlling household devices like TV, AC , Audio system.

 Lets test  whether RGB Full Color LED ( KY009 ) emits any IR rays using IR Receiver ( KY 022 )

I.Things Needed :

 1. Raspberry Pi 3 Model B+


 2. Arduino Board


 3. Solderless board

 4. Male to Male Jumper wires


5. Female to Male Jumper Wires


6. IR Receiver Sensor ( KY 022 )

7. RGB Full Color LED ( KY009)


8. Any Remote Control  ( of TV , Audio system , AC etc.. )


9. 390 ohm Resistors  to safeguard RGB Full color LED ( minimum 300 ohms recommended ).


10. USB A to USB B Connector ( to connect Raspberry Pi 3 B+ with Arduino )


II.  Install necessary packages :

a) Install Arduino IDE in Raspberry Pi 3 B+ with :

sudo apt-get install arduino
After installation, you will see the Arduino IDE as follows in Raspberry desktop :

                    
b) Connect Arduino and Raspberry Pi using USB A to USB B Cable :


You will be seeing board light blinking in Arduino board.


III.  Circuit Completion

a) Take the IR receiver  sensor ( KY 022 )  and use the female-to-male jumper wires and connect it as shown below :

White wire  : Signal  ,  S will be seen near the pin
Red wire     : VCC +5V
Black wire  : Ground ,     minus sign  will be seen near the pin

The reason why we use female-to-male jumper wire is to enable to move the IR receiver sensor. If it is fixed to breadboard, movement will be restricted.


b) Take the RGB Full color LED ( KY009 ) and connect to the breadboard as shown below :

i) R Pin  to  390 ohm resistor  to   Pin 9 of  Arduino.
ii) G Pin to 390 ohm resistor  to   Pin 10 of Arduino.
iii) B Pin to 390 ohm resistor to Pin 11 of Arduino.
iv) Ground Pin ( - ) pin to ground of Arduino.


c)  Connect  IR receiver sensor to Arduino Board

i) S Pin to Pin 6 of Arduino
ii) VCC Pin to 5V pin of  Arduino
iii) Ground Pin to Ground pin of Arduino.

Completed Circuit diagram will look as below :


IV. IR Receiver & LED  program

a)  Go to Arduino IDE, Choose the type of Arduino board : go to Tools > Board > Arduino Uno.

b) Select the port the Arduino is connected to, look under Serial Port under the Tools menu ( serial port in the raspberry Pi will be like /dev/ttyACM0).

c)  To work on IR , we need IR Arduino library. Download  the library ( zip file ) from :

      https://github.com/shirriff/Arduino-IRremote.

I have cloned the github and you can get the same package from :

     https://github.com/johnsylvester1/Adruino_IRRemote

d) Extract the Arduino-IRremote-master.zip file and rename the folder as IR folder as shown below :


e) Copy the IR folder to  Arduino IDE  libraries folder using sudo command.

            sudo cp -R /home/pi/Downloads/IR  /usr/share/arduino/libraries

f)You can see the IR library installed in Arduino IDE  as shown below Sketch  > Import Library > IR:


g)  Open a new sketch and copy the below program :

#include <IRremote.h>
int RECV_PIN = 6;
IRrecv irrecv(RECV_PIN);
decode_results results;
int redpin = 11; //select the pin for the red LED
int bluepin =10; // select the pin for the blue LED
int greenpin = 9;// select the pin for the green LED
int val;
void setup() {
pinMode(redpin, OUTPUT);
pinMode(bluepin, OUTPUT);
pinMode(greenpin, OUTPUT);
Serial.begin(9600);
irrecv.enableIRIn(); // Start the receiver
}
void loop()
{
for(val = 255; val > 0; val--)
{
analogWrite(redpin, val); //set PWM value for red
analogWrite(bluepin, 255 - val); //set PWM value for blue
analogWrite(greenpin, 128 - val); //set PWM value for green
delay(1);
}
if (irrecv.decode(&results))
{
Serial.println(results.value, HEX);
irrecv.resume(); // Receive the next value
}


}

You can download the code from :

https://gist.github.com/johnsylvester1/f5ee91ed415a79fa2908867a732a6631

h) Click Verify button  to compile the sketch and then upload the code :


IV. Executing the  program

a) You will see the RGB LED ( KY009 ) light blinking:


b)  Go to Arduino IDE > Tools > Serial Monitor and keep it ready. If the IR sensor senses any IR signal, it will display the hex value of it :


c) Now bring the IR receiver sensor ( KY022 )  near the RGB LED light ( KY009) . You will see there are no IR rays from the RGB LED light.


d) Now take the remote and then press the remote button , you will see the IR button hex value returned to Serial monitor  as shown in the video below :


Now , you have received the hex value of the remote control button and also verified there are no IR rays returned by RGB LED light.

Kindly share your comments to improve my posting.


Sunday, August 12, 2018

Getting started with Raspberry Pi 3B+ , Arduino and Active / Passive Buzzer


Hi,

 I like to share my experience connecting Raspberry Pi 3 B+ , Arduino Uno , Active Buzzer ( KY-012)   /  Passive Buzzer ( KY-006) 


I.Things Needed :

 1. Raspberry Pi 3 Model B+


 2. Arduino Board


 3. Solderless board

 4. 3 Male to Male Jumper wires.


5. Active Buzzer ( KY-012)


or  Passive Buzzer ( KY 006)


6. USB A to USB B Connector ( to connect Raspberry Pi 3 B+ with Arduino )


II.  Install necessary packages :

a) Install Arduino IDE in Raspberry Pi 3 B+ with :

sudo apt-get install arduino
After installation, you will see the Arduino IDE as follows in Raspberry desktop :

                    
b) Connect Arduino and Raspberry Pi using USB A to USB B Cable :


You will be seeing board light blinking in Arduino board.


III.  Circuit Completion

Complete  the circuit has shown below : 


                 Arduino Pin connection 
Buzzer S  Pin ( Signal)  :  to  Arduino : Pin 8

Buzzer  ve Pin : to   Arduino  Ground Pin


Please note that both Active / Passive Buzzer have the same circuit diagram 

Completed circuit :


IV. Tone Melody program

a)  Go to Arduino IDE, Choose the type of Arduino board : go to Tools > Board > Arduino Uno.

b) Select the port the Arduino is connected to, look under Serial Port under the Tools menu ( serial port in the raspberry Pi will be like /dev/ttyACM0). 


c) Go to File >  Examples > Digital > toneMelody


d) Ensure  the pin number in the Program is Pin 8 in the function tone() :

                  tone(8
                             

e) Compile the tone Melody program by clicking the tick button( left most button in IDE )

f) Click the upload button to upload the blink program.


IV. Executing the blink program

a) Output will appear as shown below :


b) Now disconnect  USB cable connecting Raspberry Pi , Arduino.

Now connect the USB cable to any Mobile USB charger.  Press the Reset button in Arduino. You will get the buzzer playing the tone.

Now , you have successfully connected Raspberry Pi , Arduino and Active / Passive Buzzer.

Kindly share your comments to improve my posting.


Wednesday, August 8, 2018

Getting Started with Raspberry Pi 3 B+ : Installation of OS and necessary configuration


Hi,

I like to share my experience how I setup Raspberry Pi 3 B+.  Raspberry Pi 3 B+ is the latest version of single board computer designed with latest features with no keyboard, no mouse and no display.

Hence you need a computer to setup Raspberry Pi.

First I ordered Raspberry Pi 3 B+ in online site : amazon.com and I got it delivered to my home.

My suggestion is go to big electronic shop , example : Mercy electronics or you can go to Richy street in Chennai and buy it. It will be much cheaper compared to online.


1) Raspberry Pi 3 B+ price :  approx  Rs 3500
2) Raspberry Pi 3 B+ case :   approx  Rs 300
3) Ethernet cable                :  approx  Rs 100
4) 16 GB Micro SD  or 16 USB Drive   : approx  Rs 400  (  OS can be installed in SD card or USB Drive)

Note : Prices are subject to vary from store to store. It is just a rough estimate only. Prices are indicative as on 7th August 2018.


You can check the Raspberry Pi version in the board as shown below :


Lets understand the parts of Raspberry Pi 3 B+ :


1. 4 USB Ports
2. Ethernet port
3. Micro SD slot
4. USB power pin
5. HDMI port
6. GPIO ( General Purpose Input Ouput ) Pins - 40 Pins


There are number of OS available for Raspberry Pi.

Some popular OS are  :

1. Raspbian
2. Ubuntu mate
3. Snappy Ubuntu core

Go to : https://www.raspberrypi.org/downloads/ to know  the complete list of OS available.


Softwares Required for setup :

1) Raspbian OS is a Linux based OS and it is the preferred one used by many.

Go to    https://www.raspberrypi.org/downloads/raspbian/
and download the Raspbian Stretch with Desktop :


2) Etcher SD Card / USB drive OS Flasher : Download the software from  https://etcher.io/   and install it in the system.


Select the downloaded Raspbian 2018-06-27-raspbian-stretch.img  file
 (latest image as on Aug 2018 ) and select the drive of the SD Card which you wish to flash with Raspbian OS and flash it.


3) Download MobaXterm from https://mobaxterm.mobatek.net/. It is required for accessing the Raspberry Pi via SSH.


4) Download VNC Viewer  from https://www.realvnc.com/en/connect/download/viewer/ and install it.


Configurations post flashing OS :

1) SSH File creation :

After flashing the OS , you will see two drives : ( F:\ and H:\ ) , considering F:\ is the flashed SD card/usb drive.

F:\ contains the boot up files for the Raspbian OS and can be accessed whereas H:\ is not accessible.

Note : Ignore the error of Windows that the H:\ drive is corrupted.

Open the command prompt and access the flashed  SD card or USB drive , give the echo command as shown below to create  a empty file ssh in F:\. It is required to enable ssh in Raspberry Pi for the first time.


F:\> echo > ssh 


2) Setting static IP and configuring Ethernet connection :

In order to use Raspberry Pi , a IP needs to be allocated to it : either dynamic or static IP. Static IP is much easier to configure. In this post, we will stick to assigning static IP to Raspberry Pi and connecting using Ethernet cable.

Go to   Control Panel\ Network and Internet\ Network Connections :


Configure the Ethernet connections : Select Ethernet connections , select IPV4 and set the properties  as shown below:


3) Assigning  static IP (say) 10.0.0.6  to Raspberry Pi :

a) Open to cmdline.txt  in F:\

At the end of the file, cmdline.txt , give a space and set :
  ip=10.0.0.6  and save it.


b) If you are using USB drive as your storage device, then the following configuration is required.

In F:\,  config.txt , set the following parameter and save the file:

           program_usb_boot_mode=1


Important Note :   program_usb_boot_mode need to be set only when using USB drive is flashed  with Raspbian OS.  program_usb_boot_mode must not be set for SD card.

Putting Raspberry Pi 3 B+ together  :

If you are using USB drive as OS, connect the Raspberry Pi as shown below :


1. USB OS drive to USB port of  Raspberry pi
2. Connect Ethernet cable to the computer
3. Connect mini USB port to the power source.

If you are using SD card as OS, connect the Raspberry Pi as shown below :


1. Insert SD card in  Raspberry pi in its slot.
2. Connect Ethernet cable to the computer
3. Connect mini USB port to the power source.


Starting Raspberry Pi 3 B+ for the first time  :

Please note that  since ssh is enabled by adding the ssh file, we are able to login via ssh protocol using Mobaxterm.

a) Connect to Mobaxterm in computer as follows using 10.0.0.6 :


b) Login to 10.0.0.6 :

Default User id : pi
Default Password : raspberry


c) Change the default password using passwd command :


 d) Enable WiFi connection and Desktop for Raspberry Pi  :

Type the following command :

  
             sudo raspi-config

i) Enable WiFi by going to : Networking Option > Network Option >  Wifi  and provide SSID and password.


ii) Similarly enable Desktop with Auto login ( no password will be asked )  by going to :

Boot option >  Desktop / CLI  > Desktop Autologin

iii)  Now, enable VNC Server by doing the following:
                  •       Navigate to Interfacing Options.
                  •  Scroll down and select VNC > Yes.


iv) Reboot Raspberry Pi using

sudo reboot

Login using VNC viewer:

Open the VNC viewer and provide the following :

IP : 10.0.0.6
User id : pi
Password : xxxxx


You will get the desktop in VNC viewer. You can now connect to Raspberry Pi similar to  any other Linux based computer.


Update the OS using the following command. Please note that WiFi network should be available to update Raspberry Pi.

sudo apt-get update
sudo apt-get upgrade


Now, you have successfully installed Raspberry Pi and have setup its desktop.

Thanks for your patience for  reading the post and don't forget to  share your comments to improve my posting :) 

Mastering IoT Development

Hi, Before reading this post, I would recommend to read the post : https://johnsylvester-johnsylvester.blogspot.com/2018/09/iot-key-co...