Hi,
I like to share my experience how I setup Raspberry Pi 3 B+. Raspberry Pi 3 B+ is the latest version of single board computer designed with latest features with no keyboard, no mouse and no display.
Hence you need a computer to setup Raspberry Pi.
First I ordered Raspberry Pi 3 B+ in online site : amazon.com and I got it delivered to my home.
My suggestion is go to big electronic shop , example : Mercy electronics or you can go to Richy street in Chennai and buy it. It will be much cheaper compared to online.
1) Raspberry Pi 3 B+ price : approx Rs 3500
2) Raspberry Pi 3 B+ case : approx Rs 300
3) Ethernet cable : approx Rs 100
4) 16 GB Micro SD or 16 USB Drive : approx Rs 400 ( OS can be installed in SD card or USB Drive)
Note : Prices are subject to vary from store to store. It is just a rough estimate only. Prices are indicative as on 7th August 2018.

You can check the Raspberry Pi version in the board as shown below :

Lets understand the parts of Raspberry Pi 3 B+ :
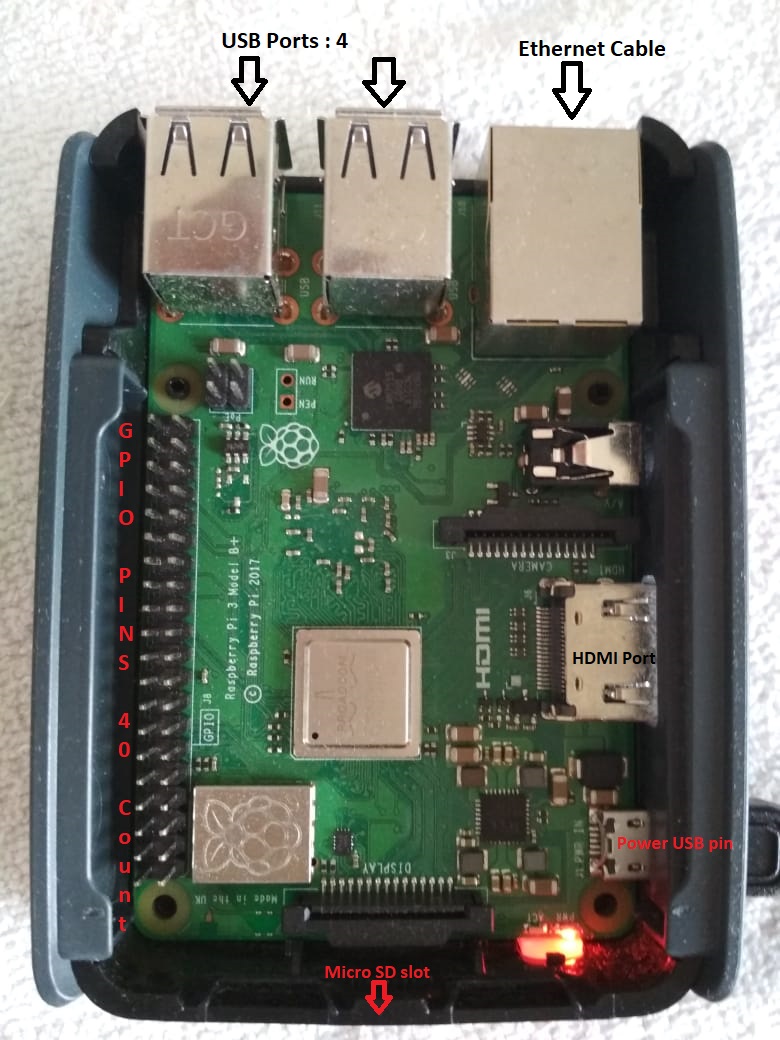
1. 4 USB Ports
2. Ethernet port
3. Micro SD slot
4. USB power pin
5. HDMI port
6. GPIO ( General Purpose Input Ouput ) Pins - 40 Pins
There are number of OS available for Raspberry Pi.
Some popular OS are :
1. Raspbian
2. Ubuntu mate
3. Snappy Ubuntu core
Go to : https://www.raspberrypi.org/downloads/ to know the complete list of OS available.
Softwares Required for setup :
1) Raspbian OS is a Linux based OS and it is the preferred one used by many.
Go to https://www.raspberrypi.org/downloads/raspbian/
and download the Raspbian Stretch with Desktop :

2) Etcher SD Card / USB drive OS Flasher : Download the software from https://etcher.io/ and install it in the system.

Select the downloaded Raspbian 2018-06-27-raspbian-stretch.img file
(latest image as on Aug 2018 ) and select the drive of the SD Card which you wish to flash with Raspbian OS and flash it.

3) Download MobaXterm from https://mobaxterm.mobatek.net/. It is required for accessing the Raspberry Pi via SSH.

4) Download VNC Viewer from https://www.realvnc.com/en/connect/download/viewer/ and install it.
Configurations post flashing OS :
1) SSH File creation :
After flashing the OS , you will see two drives : ( F:\ and H:\ ) , considering F:\ is the flashed SD card/usb drive.
F:\ contains the boot up files for the Raspbian OS and can be accessed whereas H:\ is not accessible.
Note : Ignore the error of Windows that the H:\ drive is corrupted.
Open the command prompt and access the flashed SD card or USB drive , give the echo command as shown below to create a empty file ssh in F:\. It is required to enable ssh in Raspberry Pi for the first time.
F:\> echo > ssh


2) Setting static IP and configuring Ethernet connection :
In order to use Raspberry Pi , a IP needs to be allocated to it : either dynamic or static IP. Static IP is much easier to configure. In this post, we will stick to assigning static IP to Raspberry Pi and connecting using Ethernet cable.
Go to Control Panel\ Network and Internet\ Network Connections :

Configure the Ethernet connections : Select Ethernet connections , select IPV4 and set the properties as shown below:

3) Assigning static IP (say) 10.0.0.6 to Raspberry Pi :
a) Open to cmdline.txt in F:\
At the end of the file, cmdline.txt , give a space and set :
ip=10.0.0.6 and save it.
In F:\, config.txt , set the following parameter and save the file:
program_usb_boot_mode=1

Important Note : program_usb_boot_mode need to be set only when using USB drive is flashed with Raspbian OS. program_usb_boot_mode must not be set for SD card.
Putting Raspberry Pi 3 B+ together :
If you are using USB drive as OS, connect the Raspberry Pi as shown below :

1. USB OS drive to USB port of Raspberry pi
2. Connect Ethernet cable to the computer
3. Connect mini USB port to the power source.
If you are using SD card as OS, connect the Raspberry Pi as shown below :

1. Insert SD card in Raspberry pi in its slot.
2. Connect Ethernet cable to the computer
3. Connect mini USB port to the power source.
Starting Raspberry Pi 3 B+ for the first time :
Please note that since ssh is enabled by adding the ssh file, we are able to login via ssh protocol using Mobaxterm.
a) Connect to Mobaxterm in computer as follows using 10.0.0.6 :

b) Login to 10.0.0.6 :
Default User id : pi
Default Password : raspberry

c) Change the default password using passwd command :

d) Enable WiFi connection and Desktop for Raspberry Pi :
Type the following command :


ii) Similarly enable Desktop with Auto login ( no password will be asked ) by going to :
Boot option > Desktop / CLI > Desktop Autologin
iii) Now, enable VNC Server by doing the following:
• Navigate to Interfacing Options.
• Scroll down and select VNC > Yes.
iv) Reboot Raspberry Pi using
sudo reboot
Login using VNC viewer:
Open the VNC viewer and provide the following :
IP : 10.0.0.6
User id : pi
Password : xxxxx

You will get the desktop in VNC viewer. You can now connect to Raspberry Pi similar to any other Linux based computer.

Update the OS using the following command. Please note that WiFi network should be available to update Raspberry Pi.
sudo apt-get update
sudo apt-get upgrade
Now, you have successfully installed Raspberry Pi and have setup its desktop.
Thanks for your patience for reading the post and don't forget to share your comments to improve my posting :)
2. Connect Ethernet cable to the computer
3. Connect mini USB port to the power source.
Starting Raspberry Pi 3 B+ for the first time :
Please note that since ssh is enabled by adding the ssh file, we are able to login via ssh protocol using Mobaxterm.
a) Connect to Mobaxterm in computer as follows using 10.0.0.6 :

b) Login to 10.0.0.6 :
Default User id : pi
Default Password : raspberry

c) Change the default password using passwd command :

d) Enable WiFi connection and Desktop for Raspberry Pi :
Type the following command :
sudo raspi-config
i) Enable WiFi by going to : Networking Option > Network Option > Wifi and provide SSID and password.


ii) Similarly enable Desktop with Auto login ( no password will be asked ) by going to :
Boot option > Desktop / CLI > Desktop Autologin
iii) Now, enable VNC Server by doing the following:
• Navigate to Interfacing Options.
• Scroll down and select VNC > Yes.
iv) Reboot Raspberry Pi using
sudo reboot
Login using VNC viewer:
Open the VNC viewer and provide the following :
IP : 10.0.0.6
User id : pi
Password : xxxxx

You will get the desktop in VNC viewer. You can now connect to Raspberry Pi similar to any other Linux based computer.

Update the OS using the following command. Please note that WiFi network should be available to update Raspberry Pi.
sudo apt-get update
sudo apt-get upgrade
Now, you have successfully installed Raspberry Pi and have setup its desktop.
Thanks for your patience for reading the post and don't forget to share your comments to improve my posting :)


No comments:
Post a Comment